


I have been wanting to begin writing tutorials for some time and have even received requests for tutorials on how to make things I post about. However, step-by-step photography and methodical writing is a rather labor-intensive project, and honestly, I'd rather just zip through my projects unencumbered. I finally buckled down, though, and am delighted to present you with the tutorial for the Trapezoid Clutch, which I designed. (Wow, that feels good to say!) I hope you enjoy it!
Note #1: Please excuse the poor lighting in the photos below; the best time for me to work is after the boys are in bed, which means that I'm working under not-natural light, resulting in some funkily-colored photos.
Note #2: As I mentioned above, this is my first tutorial, so if I leave anything out or something is unclear, please leave a comment with your question(s) on the blog post in which I introduced this tutorial. I'll do my best to answer them with a further comment.
Note #3: All the seam allowances are 1/4 in., unless otherwise noted.

Supplies:1: fusible fleece (you can use plain fusible interfacing, if you'd like, but I have excellent results with the fleece)
2-4: three coordinating colors of fabric5: coordinating 9 in. zipper6: coordinating ribbon for accent (optional)7: coordinating thread
2-4: three coordinating colors of fabric5: coordinating 9 in. zipper6: coordinating ribbon for accent (optional)7: coordinating thread

Tools:1: sewing machine2: rotary cutter, self-healing mat, and ruler (you can use a ruler, pencil, and scissors if you don't have a rotary cutter and mat, but it will be less accurate)3: scissors4: pins and needle5: (not pictured) iron and ironing board

1: Begin by cutting your fabric. You will need:~one 14 in. x 7 1/2 in. piece of fabric (Piece A, pictured above)~one 14 in. x 2 in. piece of fabric (piece B, pictured above)~one 14 in. x 4 1/2 in. piece of fabric (piece C, pictured above) If you look closely, you will notice that I made a piece of fabric large enough to make piece C by sewing two smaller pieces of fabric together. I covered the seam created by this by topstitching the coordinating ribbon over it before moving on to the next step.~one 14 in. x 13 in. piece of fabric (piece D, pictured above) for the lining of the bag.~one 14 in. x 13 in. piece of fusible fleece (not pictured above)

2: Pin piece B to piece A, right sides together, lengthwise. Sew together. Repeat with piece B and piece C. Iron and trim (if necessary) to 13 in. x 14 in. You now have two 13 in. x 14 in. rectangles: a solid one for the lining, and a striped one for the outer bag.

3: Fold both rectangles in half, carefully matching the edges, making 13 in. x 7 in. rectangles. Finger press the folds to make sure they stay in place.

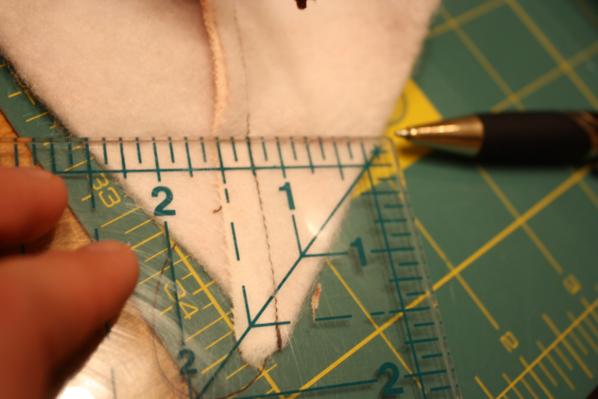
4. At the top of your rectangles (where the two edges of fabric come together, not on the fold), measure and mark two inches from the side. Repeat with the other side and with both sides of the lining rectangle.

5. Connect the bottom corner (right where the fabric folds) and the two-inch mark you just made with your ruler. Cut along this diagonal line. Repeat with the other corners and two-inch marks.

You should now have two trapezoids.
 5. Repeat steps 3 and 4 with your fusible fleece rectangle. Only instead of marking the top edge 2 inches from the sides, mark it at 1 7/8 in. from the sides
6. Unfold the striped, outer layer of the bag and the fusible fleece. Place the fusible fleece "fuse dot" (I'm not quite sure how else to describe it) side together with the wrong side of the striped outer layer of the bag. Line the fleece and fabric up at the corners where the fold was. Iron to fuse the fleece and the fabric together. Usually after lining up the fleece and fabric, I carefully turn it over and press from the fabric side. You may want to experiment on scraps to find what works best with the combination of your iron and fabric.

7. Note that in the photo illustrating the previous step, the fusible fleece is smaller than the fabric. Make a 1/4 in. fold with the unlined section and iron it so that it will stay crisply folded. Repeat with the other side as well as with the lining fabric that isn't attached to fusible fleece.

You should now have 1/4 in. folds on all four edges that formed the tops of the trapezoids when the fabrics pieces are folded in half.

8. Do whatever decorative top stitching you want on the outside layer of the bag. I chose to sew straight lines 1/8 in. on either side of the seams between the fabric stripes.

9. Now it's time to put the zipper in. Put the unfolded bag lining and the striped, outer bag layer, wrong sides together. They should be the same size, and the folded edges of the lining and outer layer should be together. Place the unzipped zipper between the two folded edges. The end of the zipper teeth should be about 1/2 in. from the unfinished fabric edges (shown in above photo), and the two fabric layers (the lining and outer bag) should be the same distance away from the zipper (between 1/8 in. and 1/4 in.). Carefully pin the zipper between the layers in this position.

I use a lot of pins, and I carefully check both sides as I go to ensure that both layers are an even distance from the tooth part of the zipper. You will also want to make sure the fabric is far enough away from the zipper teeth that the sliding part of the zipper can move smoothly back and forth.

10. Sew the length of the pinned fabric about 1/8 in. from the folded edge. This seam should secure both the top layer (the outer part of the bag) and the bottom layer (the lining of the bag) to the zipper, in a nice, tidy way.

If you pinned carefully, the top should look like this.

And the bottom should look like this.

11. Repeat steps 9 and 10 with the other side of the zipper and the other neatly pressed edges. When you're done attaching the zipper, it should look something like the photo above.

12. Move the sliding part of the zipper to the middle, and turn the bag inside out. The bag should now make a sort of figure eight with the zipper in the middle.

13. Pin the sides together as pictured. (Ignore the seam stitched with light thread up the brown lining; I had to piece it too.)
14. Sew a 1/4 in. seam from one point to the other on the first side. Make the zipper lay as flat as possible, and backstitch over it for added stability.
15. On the second side, you will want to start at the point of the outer part of the bag, cross the zipper (remembering to try to make it lay flat and backstitching over it!). Backstitch about 1/2 in. past the zipper on the lining side. Skip about two inches, backstitch, and resume your seam 1/4 in. from the edge. Continue until you reach the corner.
(Sorry for the lack of photos)

16. Now it's time to box the corners. Take one of the bag exterior corners, and fold it so that the seam in in the center (as pictured). Make sure that it's truly straight up and down with an even amount of fabric on either side. Pin it so that it stays where you want it. (Okay, so I didn't do it for the photo, but it really helps!)
17. Use your ruler to find the spot where your little fabric triangle is 2 1/2 in. wide. Mark it, and sew along the line. Don't be afraid to be pretty aggressive with your marking; it won't show. : ) Repeat with the other exterior corner as well as with both lining corners. Backstitch at each end for additional strength.

19. Squeeze your fingers inside the little hole left in the lining. Unzip the zipper, grab the bottom of the outer layer of the bag, and pull it right side out through the hole. It'll probably be pretty tight fit, but it should all come through with a little coaxing.

20. Turn the bag so that the lining is visible. Fold the exposed, raw edges of the hole you used for turning the bag right side out neatly back about 1/4 in. (to match the width of the rest of the seam). Hand sew the hole closed, preferably with an invisible stitch.
21. Turn the bag right side out. Iron it if you want to.
22. Admire your handiwork: a cute, completed trapezoid clutch!

There many variations you can make based on this basic pattern. You could use a simple, solid piece of fabric instead of sewing three together to make stripes. Or you could make horizontal stripes instead of vertical stripes. You could use more prints to make more than three stripes of fabric or you could only use two. You could even add ruffles, bows, lace, or a flower pin (tutorial coming soon). Let me know if you used this tutorial and what variations you did. I would love to hear about it (and maybe even see some photos for further inspiration)!
1 comment:
nicely done, christina.
Post a Comment